If you are anything like me, you find inspiration in many things, and often from places that you wouldn't always expect. This week was one of those weeks for me! I was inspired by this card my 8 year old made for one of his friends! I helped with the embellishments, but the rest of the card was his doing...
I was so impressed that he made this on his own! He doesn't see all of the fancy technique tutorials that we see on a daily basis. Reilly's simple pop-up card reminded me that a technique doesn't have to be fancy to have lots of impact, so today I am giving you directions to make your own simple pop-up card.
(1) Inside piece of cardstock measuring 8 x 10.5"
(1) Outside piece of cardstock measuring 8.5 x 11"
Whimsie Doodles Stamps
Embellishments (optional)
Adhesive and Scissors
Step 1:
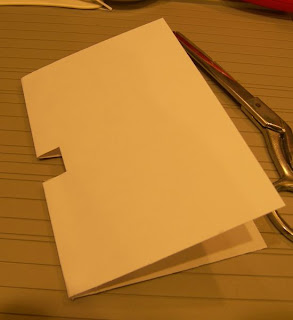
Score and fold your inside piece of cardstock the the 4" mark. Using your scissors, snip two small lines in the folded cardstock as shown below.
Step 2:
Press the cut strip through the fold and press down to make the folds crisp.
Step 3:
Score and fold the outside piece of cardstock at the 4.25" mark, and attach the inside piece of cardstock to the outside piece, being sure not to get adhesive on the tab you just created.
Step 4:
Turn your card in the "landscape" direction. Add adhesive to the bottom half of the folded tab that you created, and attach your image. You will attach it differently for different images, but for mine, I wanted the feet to touch the bottom of the page.
Step 5:
You have a pop-up card! Embellish and decorate as you like!
My card features the adorable Castle Pearl image!


1 comment:
Thank you for the tutorial for a fun card...
Post a Comment