Our guest designer from January, Linda Cummings, was kind enough to put together this tutorial on paper piecing with digital images. If digital stamps are new to you (or even if they aren't), you can add this to your repertoire of ways to use them. Have a great day!
Paper Piecing with Digital Imagesby Linda Cummings for Whimsie Doodles
Supplies:
White Cardstock (size to accommodate printer)
Colored Cardstock (size to accommodate printer)
Small sharp scissors or craft knife
Adhesive
Digital Image
Fine Black Permanent Marker
Directions:
Once you have chosen the image you want to paper piece, you can then decide the colors and amount of cardstock you need. For this tutorial I used the image 'This Bud's for You'.
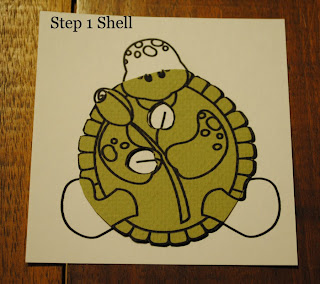
Looking at the image, I decided I needed 3 shades of green (shell, underside of shell, body)
and red for the rose. I would use one of the green shades for the rose stem and one shade for the
leaves.
I printed a white base sheet, the 3 green sheets, and a red sheet. It is important to note the size of the image you are printing just in case you make a mistake and have to print another sheet.
When cutting out the pieces leave as much of the black outline as possible; however, try not to
leave any colored paper that is outside the outline.
When adhering pieces it is important to start with the bottom piece. You want to
build up the image so that the dimensions look correct. In the image 'This Bud's for You' the outer shell is the bottom (or back piece), and the rose bud is the top (front).
After you complete the paper piecing you can correct small areas with a black marker if needed.
On 'This Bud's for You' I filled in the spots on the turtle with a dark green marker. I could have printed a brown or dark green sheet and cut the spots out. I added white dots on the eye.


10 comments:
Great tutorial..I have never tried paper piecing before. you made it look easier than I thought!
This is wonderful Linda.. I have not tried this before and now you have inspired me.. Thanks for all your pictures too..
Thank you. This was very helpful.
Great tutorial....TFS!
Fabulous tutorial Linda!! Thank you so much for putting this together for us!!
I can't wait to try this -- thanks!
Great tutorial! It's given me enough confidence to try it on my own!
Thanks so much for this tutorial!
My kids loved the This Bud's for You cards i made them! Thanks so much!
Post a Comment