Showing posts with label Tuesday Tutorial. Show all posts

Wednesday, October 10, 2012

How to make a Faux Picture Frame

Hi all, Melyssa here and I have a card to show you that I started a little while ago but never got around to finishing it. I started by making a Faux picture frame and hanging onto the front of a card.  Then I printed, coloured and framed the image.  Add some embellies and it's done!

Here's how to make a faux picture frame.
1. Cut a square from "wood" pattern paper or wood grain stamped paper
2. Next cut a smaller square out of the center to make a frame.
3. Fold the corners to create a diagnol crease and ink edges
4. Add 3D foam squares to raise the frame
5. Hang it with some twine and a small brad (nail)

Here's my card.
Digi Stamp-Lizzie's Pumpkins

Thursday, August 9, 2012

"no line" colouring technique for Digital stamps

There's a new technique out there that uses a very pale ink colour (Desert Sand by Memento) to stamp an image with and then make them pop with colour.  I LOVE this technique, it gives the images a softer and whimsical look.  Until now I have never tried it with digi stamps.  Now that I have I'm completely hooked. I can't keep my Copics down....here are some samples of digi stamps I've coloured using the "no line" technique and my Copic markers.


So do you want to know how to print them?  Here's what I did..
If you download Gimp.org (free software) then you can change the digi border.
Click >File
>Open (for your image of choice)
then:
>Colors
>Colorize
>then adjust the colors to approx. 349/97/95
(you can play around with the pink tone to your liking)

Once you have the color you want, be sure to hit
>File
>Export

Thanks to my friend Joni Wilson for sharing this.

Here's a tutorial from Splitcoast Stampers and how to create this look

Tuesday, January 10, 2012

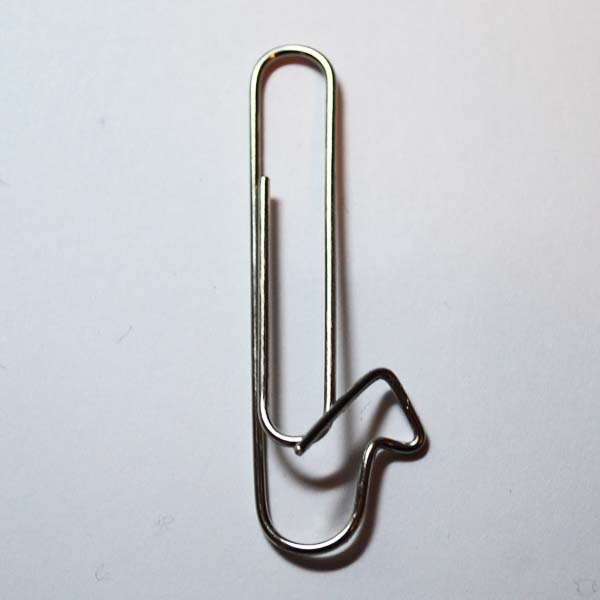
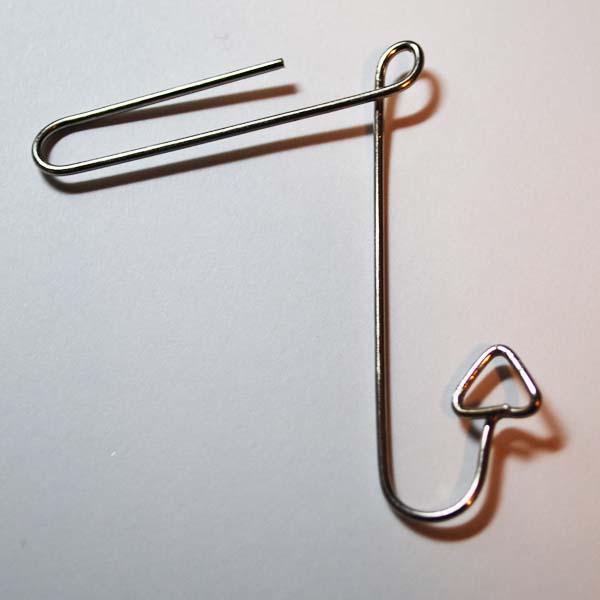
Up cycle Paper clips by making fish hooks!

Hi everyone, I had a brain storm the other day and came up with a cute embellishment for the our newest digi "Great Catch" and a paperclip
 Step 1
Bend the end of the paper clip just above the bottom loop to the right at a 90 degree angle.
 Step 2
Now bend the end back at a 45 degree angle leaving a small space.
 Step 3
Move down a little further down and bend the clip end down to form the arrow point.
 Step 4
Bend the final end piece of the clip 90 degrees toward the centre.
Trim any access.
 Step 5
Bend the top of the paper clip completely around to form a loop, wrap around the clip stem and trim access.
 Ta da!!  A Fishhook!
Here's my card with it all together.

Tuesday, September 27, 2011

Tuesday Tutorial: Felt Owl Magnet

Today's tutorial will help you make your own adorable felt magnet using the Halloween Hootenannies!  Don't have colored felt?  No worries!  You can use your Copic refills to customize white felt.  Enjoy!


Step 1: Print pattern and trace onto felt pieces.
Step 2: Cut felt pieces

Step 3: Pour Copic refill ink into baggie and add a little water.  
Then add white felt pieces.

Step 4: Use a new baggie for each colour.  
Assemble pieces, stitch details and buttons.

Step 5: Punch a Zig Zag border and use as a template.

Step 6: Use the dots for stitching pattern.

Step 7: Stitch both sides and top of owl to a felt back.  
Stuff and add magnet.  Stitch the bottom to close. Finish with bow.

Tuesday, August 23, 2011

Tuesday Tutorial Colouring Hair Blond

Hello everyone, Melyssa here and I'm sorry I'm so late with this post I can't believe it's Tuesday already.  I've been busy colouring with the new images being released September 5th.  And I have found my favorite "blond" hair colour.  I can't wait to share it with you today.  The exciting part is that I have made a couple of video tutorials on how to create the hair below and what colours to use.  This method can be applied with any hair colour combo, more videos using different hair colours are coming.

  I hope you find the video useful and if you have any suggestions for improvement please just leave me a comment.
Copic colours-E35,53 and 50

Tuesday, August 9, 2011

Tuesday Tutorial: Creating Fur with Copics

Today's tutorial from Melyssa is a video to help you master FUR with your Copics!
To create the following, you will need E33 (highlight), 99(midtone) and 39(shadow), or the like.  Oh, and this fabulous video, of course!!  Happy Coloring!!


The Paws I Care digi stamps were used to make these cards.

Tuesday, July 12, 2011

Tuesday Tip: Cleaning Your Sticky Scissors


Today's tip is short and sweet, but very helpful. I  found this tip a while back 
and can vouch that it works wonderfully. 


When your scissors get sticky from cutting foam tape, 
just spray them with WD40 and wipe it off with a paper towel. 
Works like magic!

Tuesday, June 28, 2011

Yesterday's Post and Creativity Camp

Greeting from Cullowhee, North Carolina!  (Yes, there is such a place--LOL).  Me and my two boys are here for the week visiting my brother and sister-in-law while the oldest (Reilly) attends Creativity Camp at Western Carolina University.  He was in the Inventor's Club, and this week he decided that he would invent a mechanical spider.  I love that they are letting the kids decide what they will create.  Yesterday they brainstormed ideas, today they researched and tried some ideas out.  

Enough about what is going on in my world....

Yesterday's post featuring Melyssa's projects had a couple of questions in the comments section that I thought I would address...

1.  What is an SVG file?
SVG files are "Scalable Vector Graphics" (a relatively new file type) for storing vector graphics, which can be used to store illustrations among other things.  It is also the type of file easiest to import into your SCAL software.

2.  What is SCAL software?
(I took this definition from the Craft Edge website).
SCAL or"Sure Cuts A Lot" is an easy to use software to cut your True Type fonts, SVG files, images, and various shapes with various electronic cutting machines, including Craftwell eCraft™, Black Cat Cougar/Lynx™, Boss Kut Gazelle™, Pazzles Inspiration™, Silhouette SD™, USCutter™. Available for Windows and Macintosh. 

3.  Where is that adorable sailboat in Melyssa's baby card? 
The sailboat is in our Baby Joy rubber stamp set:

Have a great Tuesday y'all!  I'm off to film a music video.....

Tuesday, June 21, 2011

Tuesday Try This: Man Card Patterns

We are so blessed to have a fearless leader like Melyssa that is not just creative and talented, but is also super generous!  Check out these amazing cards and follow the links to get the shape patterns for FREE!  Then be sure to leave Melyssa some love for being so awesome ;)


Tuesday, June 14, 2011

Tuesday Tutorial: Envelope Gift Bag

Today's tutorial would be perfect for a special Father's Day gift!

Here is what you need:
9x12 Catalog Envelope
  • Scoring Tool
  • Adhesive
  • Ribbon
  • Whimsie Doodles Stamps
  • Embellishments (optional)
    • Here is what you do:
    • Step 1:
    • Trim 3 inches off of the envelope from the open end.

  • Step 2:
  • With the opening of the envelope at the top, score in 2 inches from the right, left and bottom edges of the envelope.

  • Step 3:
  • You will have a 2 inch square in each bottom corner, score from inside corner to the outer point (diagonally).


  • Step 4:
  • Decorate the front of your gift bag now, staying within the score lines.

  • Step 5:
  • Crease the score lines and pop the envelope into a bag, carefully bringing the bottom corner squares into a point on each side.  Give the points a crisp fold and apply adhesive to flaps that will fold in to the bottom of the bag, then fold flaps in to form bottom of the bag. The bottom will measure 5.75 inches by 4 inches.


  • Step 6:
  • Punch holes to create a ribbon closure and embellish the front to complete your bag!

    I used a corner rounder to round the top corners of the bag.  My bag features one of the images from the new "Dad's Tickets" set, and the worm from the "Shell-a-Bration" set.

    Tuesday, May 31, 2011

    Tuesday Tip: Metal Die Storage

    Happy Tuesday!  I get a crafty newsletter each month that always has great ideas, but I was especially excited about this one and just had to share.  My metal dies are always a mess, but I'm in the process of making them easily accessible (and visible) using magnetic knife holder strips for the kitchen!!

    Check it out...  I haven't attached them to the wall yet, but you get the idea!

    My magnetic strips came from Ikea, and they could very easily be covered with pretty papers or even fabric.

    Tuesday, May 24, 2011

    Pocket full of....ties??

    Good day everyone!  Today I have a quick tutorial on how to make a little pocker to stuff a tie in for Father's Day.  It's similar to a money card only it has a tie.  Now my hubby does not own a tie so I couldn't show you a picture of the pocket actually stuffed with one.  Sorry.
    Here's what the pocket looks like finished.

    So let's get started.
    Step 1. Take a piece of 8 1/2 x 11" cardstock (or pattern paper).
    Score along the 11" side at the 3" and 7" mark.
    Step2. Score 1/4" (0.25") along the 11" side.  Cut away the top edges leaving the last 4" with the flap.
    Step 3.  Fold the flap and trim the edges. (cut off the corners) Fold and glue to the inside of the pocket.
     Step 4. Measure 2" from the top outside edge then cut from the 2" mark to the corner of the fold.
    Step 5. Your pocket will look like this
    For a more decorative look use double sided pattern paper and punch half a circle in the top inside of the pocket.  Below you can see how I "eyeball" where half the circle by lining up the paper with the support lines in the punch body.
    To make the wrap tie thingy I punched a 2" circle and threaded the button and circle with twine.  Tie one end in a knot.  Then wrap the twine around the pocket and button to hold.  I added a second smaller button to finish the end of the twine.
    Have a great day!!

    Tuesday, May 17, 2011

    Tuesday Tip: Detailed Die Cutting

    Good morning sunshines!  I read a wonderful tip on a Splitcoast Stampers forum recently, and I had to share it with you today...  I'm not sure who came up with it first, but thank you whoever-you-are!

    When you use a die cut out that has a lot of tiny details, use a lint roller to get all of the little holes out. Just roll the lint roller over the cut out in the die (or take it out and hold it down while you roll it) and the tiny pieces will pop right out... and with no residue!  Awesome, right?!!

    If any of you out there have any papercraft ideas or tips that you'd like to share, 
    feel free to drop me a line at NCSUnikki@aol.com, any time!

    Tuesday, May 10, 2011

    Tuesday Tutorial and freebie

    Today we have a tutorial and FREEBIE for you!!  Just a little something punny to give you a little chuckle today. Here's the image coloured.  Like the grass?  
    The tutorial below shows you how to create it. So grab your Copic YG91,95,97 (or favorite greens) and let's get started.
    To get this freebie just click on it and save.

    Here's the tutorial.


    Tuesday, May 3, 2011

    Tuesday Tip: Use a Fake Tattoo on Your Project

    Are you looking for a fun way to spice up your card layouts?  Dig into your kids' (or your own) fake tattoo collection and add it to your card!  Lay it on your card and gently pat it with a barely damp cloth.  For good measure, rub over the images with a stylus, then remove the transfer paper carefully!
     __________________________________________________


    Copied from Alicia's blog Since we are coming up on Teacher Appreciation week, you will receive the PDF artwork for the above frame (Keep Calm and Teach On) for FREE if you purchase the digital stamp set it was created with: School Goodies. Your files will automatically come zipped together with the digital set and extra artwork file.


    Thanks Alicia for making this cute PDF.